

A properly applied roof coating system can breathe new life into a mature low-slope roofing system, brightening its appearance, enhancing its energy efficiency and delaying for years the day when it will have to be recovered or replaced. The operative phrase in that sentence is “properly applied.”
Coating a roof is more than simply spraying, rolling or brushing on the finish coats. What will determine the quality and longevity of the installation is the time and attention paid to preparing the roof before it is coated.
Too often, contractors take shortcuts on, or skip altogether, this essential first step. The result? Problems with the existing roofing system remain problematic, the coating system does not properly adhere to the substrate, and a roof restoration that could have lasted 10 or 20 years fails in as little as two or three.
Completing three simple steps before applying the coating system will prevent this outcome and help ensure the newly coated roof delivers the expected years of hassle-free, watertight performance. First, repair any existing damage. Second, perform an adhesion test. Third, thoroughly clean the roof surface.
Why Preparation is Essential
It is understandable that contractors new to coating application and untrained in the process could overlook the preparation step. Their experience is in working with roll-good roofing, where preparation is a step that can be overlooked because the existing roof will be recovered or replaced with new TPO, EPDM, PVC or modified bitumen. The new system will cover up any leaks or other damage and will be designed to address ponding water or other issues that plagued the existing roof.
When coating, however, the contractor is not installing a new roof, but is restoring or maintaining the performance of the existing roofing system. Roof coatings are not “miracles in a bucket.” They will not fix leaks, reseal open seams, repair deteriorated flashings or loose terminations, prevent ponding water, address damaged or saturated insulation or substrates, or correct other problems with the underlying roofing system. Those issues will still exist after the coating has been applied and may prevent the coating from properly adhering to the roof. And if a coating is slapped on top of a grimy, greasy, debris-ridden roof, it almost certainly will soon begin to flake, blister or peel off.
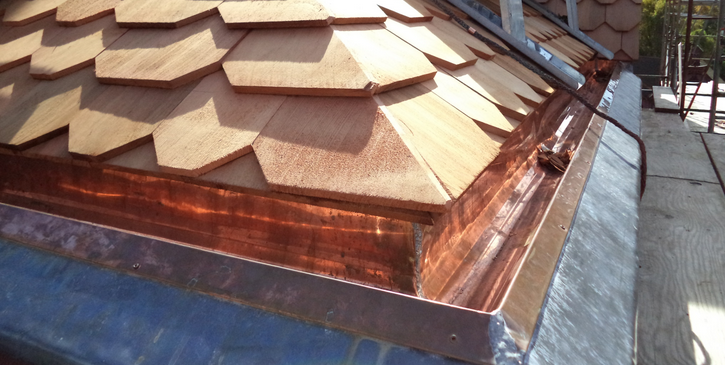
Repair Existing Roof Damage
Step one is to assess the existing roofing system and make necessary repairs, carefully following the relevant guidelines from the manufacturer of the original roofing system and the National Roofing Contractors Association (NRCA). In general, the existing roof assembly must be structurally sound, watertight and free of shrinkage, buckling, unacceptable ponding conditions, encapsulated moisture, open seams, open or damaged flashings, loose terminations and other serious defects. Coatings also should not be applied if the substrate or insulation is saturated with water.
The good news is that, with some simple repairs, even a roofing system with significant damage can be made a viable candidate for coating. The following examples illustrate some common scenarios.
Problem: A roof has an area that is susceptible to ponding water.
Solution: Fill the ponding area with slope-correcting materials, or correct the slope with a cricket or tapered insulation, and cover it with new materials similar to those of the existing roof. It may be necessary to install drains to allow positive drainage.
Problem: A 2-square area of a 100-square TPO membrane is damaged.
Solution: Cut out the problem area and replace it with like material, or heat weld two squares of new TPO over the existing membrane to recover the damaged area.
Problem: There is an active leak in one corner of a roofing system.
Solution: Cut into the damaged area. Remove and replace the saturated insulation if necessary. Fold the membrane back in place and flash around where the cut was made.
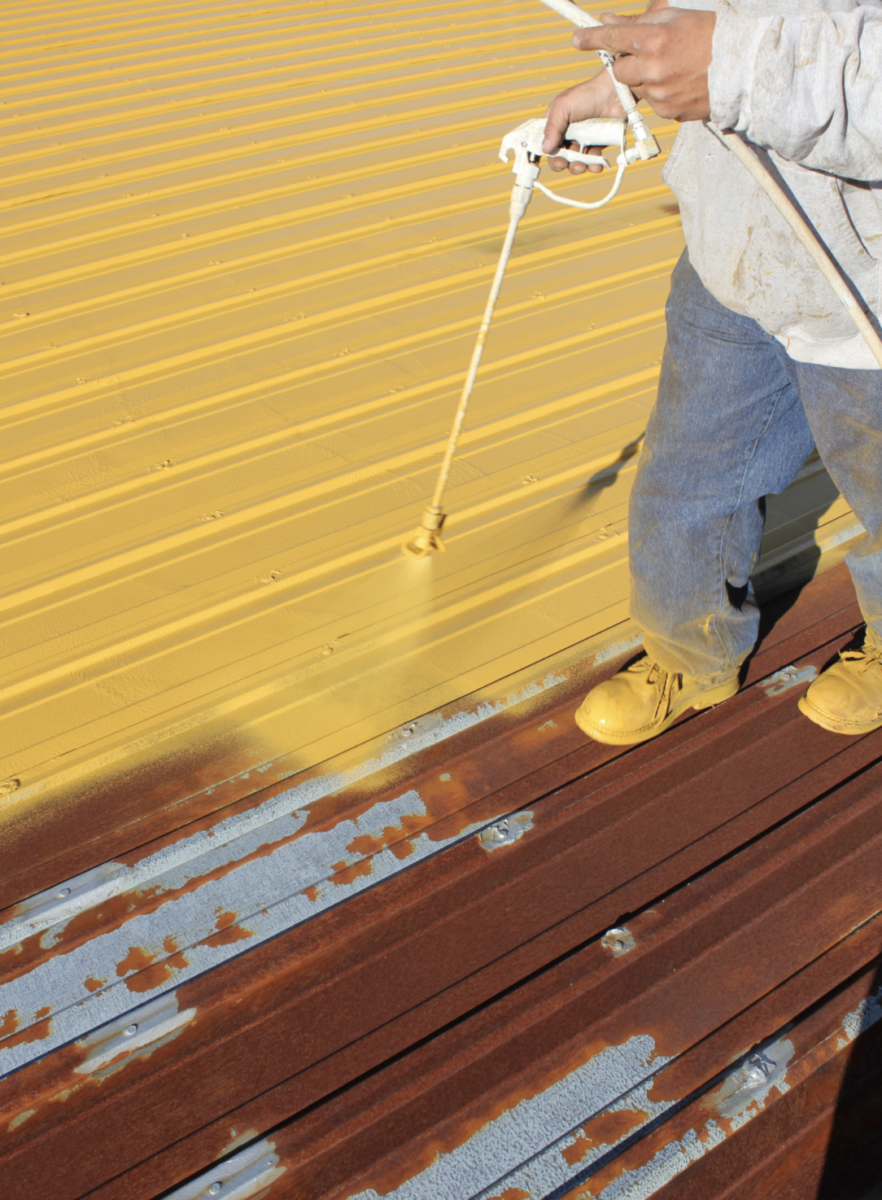
Problem: A metal roof has rusted.
Solution: If the panels remain structurally sound, apply primer to encapsulate the existing rust and inhibit the creation of additional rust. If any panels are so corroded that they are no longer structurally sound, replace them; the remaining panels can be left in place.
Problem: The seam welds on a TPO or PVC roofing system are pulled or loose.
Solution: Several options are available. (1) Reheat the seams to weld them back in place. (2) Put a target patch made of new membrane over the seams. (3) Reseal the seams with flashing compound.
Perform an Adhesion Test
A coating’s performance depends on how well it adheres to the substrate. An adhesion test should, therefore, be performed to ensure that the coating is compatible with the substrate and that encapsulated moisture or other underlying issues that could impact adhesion have been properly addressed.
Instructions from the coating manufacturer should be followed, and those instructions may vary based on the warranty desired, but following are general guidelines.
Choose a 2-foot-by-2-foot area of the roof as the test site. Clean the area using a rag or bristle brush and a solvent that will flash off quickly without leaving a soapy residue behind, such as acetone, xylene or mineral spirits.
Coat a 1-foot-by-1-foot section of the test area, replicating what the finished system will be. If the roof will be primed, prime the test area. Apply primer and finish coats at the same application rate that will be used to coat the entire roof.
Embed several strips of Tietex or other polyester-reinforced fabric, each roughly 1 inch wide and 12 inches long, into the coating, leaving a 4-inch-long pull tab outside of the wet area. Brush the fabric to embed it into the coating. Apply a second coat of finish coat to ensure the fabric is fully saturated. Allow the coating to cure fully, at least 4 to 5 days.
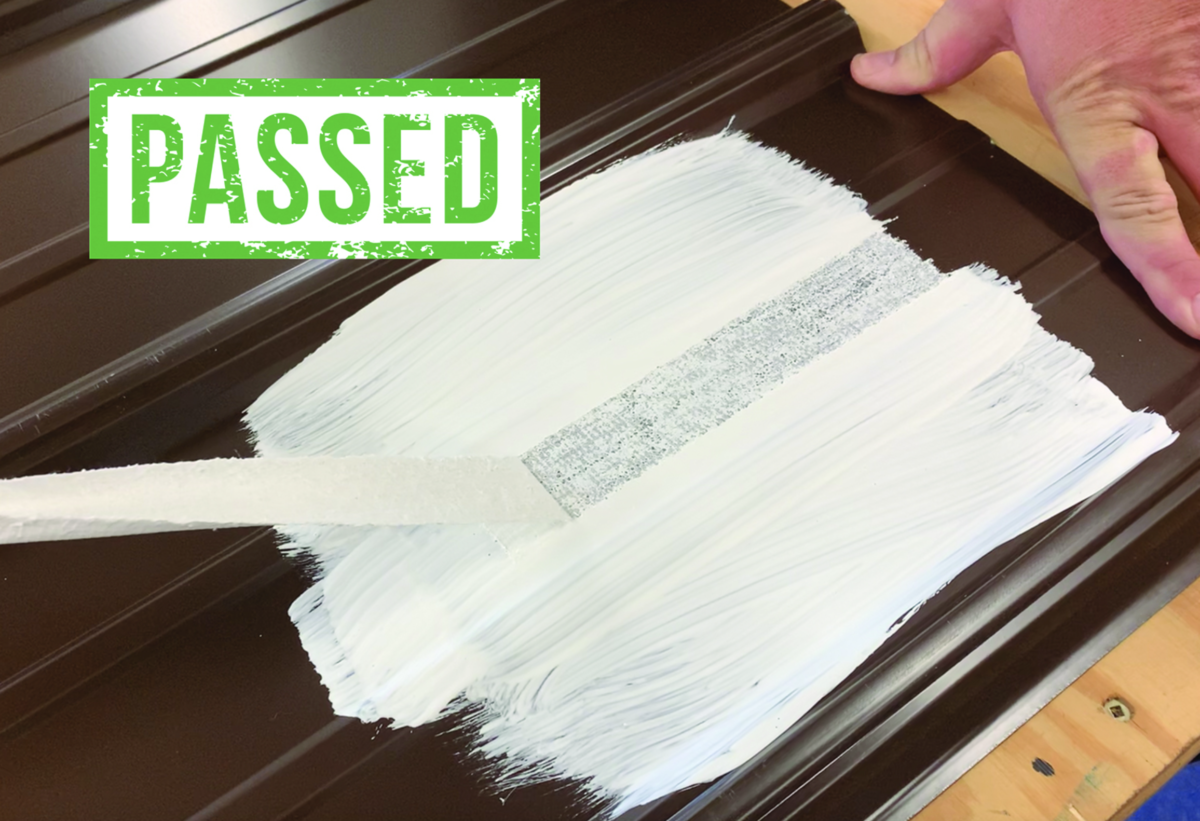
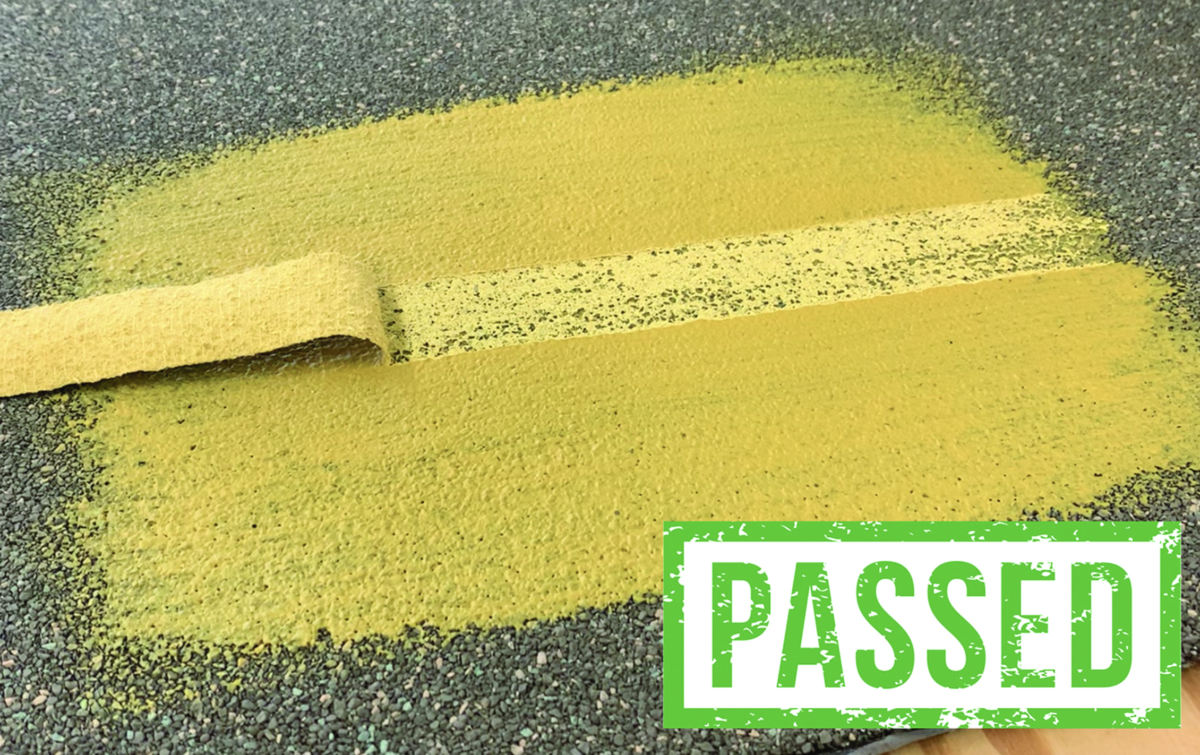
Test the adhesion using a fish scale. For each test strip, tie a knot in the loose, uncoated end of the fabric strip. Hook the fish scale into the knot. Using the fish hook, pull the fabric straight up. The ideal “pull strength” is at least 4 pounds per linear inch (pli) of fabric, or at least 4 pli over a sound and dry substrate.
The test is a “pass” if the fabric separates from the coating, leaving the coating still adhered to the roof membrane. The test is a “fail” if the coating separates completely from the roof surface.
All adhesion tests should be documented with photos of the cleaned substrate, the wet coating and embedded fabric, and the face or display of the fish scale showing the resistance observed in the test.
Clean Thoroughly
Roof surfaces must be thoroughly cleaned prior to coating. Over years of constant exposure to the elements, dirt, oils, bird droppings and other debris collect on a roof’s surface. If not removed prior to coating, they interfere with the coating’s ability to adhere to the substrate. Rather than sticking to the roof, the coating fuses to the grime and, unsurprisingly, may soon begin to peel off.
The best results will be achieved by applying the manufacturer’s recommended roof wash or cleaner and then power washing. While power washing alone will get the roof clean, the roof wash loosens the dirt, grease and other debris, allowing it to be removed with less-aggressive power washing.
This gentler approach significantly reduces the risk of damaging the roofing membrane while cleaning. Years of being subjected to sun, rain, snow, ice, heat and cold can weaken the membrane, and a blast with a heavy-duty gas-powered rig generating 2,800–4,000 psi of pressure can easily blow a hole in it. With the detergent, a smaller rig generating only 1,800–2,500 psi of pressure will remove the sediment in most cases. Using a walk-behind power washer, rather than a common extension wand-type setup, also helps ensure adequate cleaning pressure at the surface of the substrate without over-exerting effort on the behalf of the worker.
Rinse water should be directed toward drains and scuppers to ensure the detergent and debris are completely removed. If the rinse water is simply allowed to evaporate, what can be left behind instead of a clean, coating-ready surface is a caked-on mixture of gunk and detergent residue.
EPDM roofs should be power washed twice — once with cleaner and once with clean water. The carbon black that gives EPDM its black color breaks down over time, and that dust must be removed to ensure proper adhesion of the coating. The test of whether the carbon dust has been completely removed is a quick wipe of hand across the surface; a clean hand means a clean roof.
Granulated modified bitumen roofs should be swept with a dry broom or power broom prior to power washing to remove loose granules that could clog the roof drains.
Make any necessary repairs. Perform an adhesion test. Thoroughly clean the roof surface. Completing these three simple steps before coating will help ensure a successful roof restoration that extends the roofing system’s life, adding years of weathertight, hassle-free performance.
About the author: Jeremy Grunewald is Product Category Manager – Liquid-Applied Systems for Mule-Hide Products Co. Inc. (mulehide.com), manufacturer of low-slope roofing products and systems. He has nationwide responsibility for the company’s portfolio of coatings, caulks, sealants and asphaltic products. He is on the Board of Directors of the Roof Coatings Manufacturers Association (RCMA) and is a member of ASTM International’s Committee D08 on Roofing and Waterproofing. He is a Registered Roof Observer through The International Institute of Building Enclosure Consultants (IIBEC), is a ProCertified Trainer through the National Association of Roofing Contractors (NRCA) and holds NRCA ProCertification for Training. He can be reached at [email protected].
Repairs to Make Prior to Recoating
Following are general guidelines contractors should follow to return a roofing system to sound, watertight condition prior to coating. Consult with the manufacturers of the original roofing materials and the coating system for more specific instructions.
• Areas of the roof that are subject to unacceptable ponding water must be addressed. If any of the following conditions are present, corrective steps must be taken to ensure positive drainage: Water remains on the roof for more than 48 hours after a rainfall; water collects at a depth of more than 1/4 inch at any time; retained water covers more than 5 percent of the roof’s surface. Fill the ponding area with slope-correcting materials, or correct the slope with a cricket or tapered insulation, and cover it with new materials similar to those of the existing roof. It may be necessary to install drains to allow positive drainage.
• Defects and leaks should be remedied in accordance with instructions from the original roofing system manufacturer or NRCA guidelines.
• Damaged insulation, damaged membrane, and fasteners that have backed out should be repaired following instructions from the coating system manufacturer.
• Any wet insulation should be removed, replaced and covered using the same type of roofing material and installation method. NRCA guidelines for repairing and replacing any area containing damaged or wet insulation or substrate should be followed. Moisture scans, followed by core cuts, should then be completed to confirm the condition of the insulation and substrate.
• Existing flashings should be properly terminated according to NRCA guidelines or specifications from the original membrane manufacturer. Defective terminations and damaged flashings should be repaired.
• Curbs and penetrations should not interrupt the flow of water off the roof. If defects exist, crickets should be installed to divert water around the penetrations.
• Passive one-way vents or active solar-powered vents may be used to help dry out a roofing area or to ensure adequate vapor migration out of the roofing system if moisture may be present or the operating conditions underneath of the roof line generate considerable moisture vapors.
Performing an Adhesion Test
Following are general instructions for performing an adhesion test prior to coating system application. Specific instructions from the coating system manufacturer should be followed.
Cleaning
1. Clean a test area at least 2 feet by 2 feet in size.
• Application of a solvent (acetone, xylene, mineral spirits, etc.) and power washing is preferred.
• If power washing is not possible, apply a solvent, scrub the area, and rinse well with water.
Test Construction
1. Pre-cut several strips of Tietex fabric, 1 inch wide and 12 inches long.
2. Apply coating onto the clean, dry substrate in the same manner prescribed in the scope of work. The area should be approximately 1 foot by 1 foot.
3. Immediately embed a Tietex strip into the coating, centering it in the coating but leaving 4 inches of the strip laying loose past the edge of the coating. Do not embed the entire length into the coating. Dry brush the fabric into the coating to ensure complete embedment with no voids, air pockets or wrinkles.
4. Apply a second (top) coat of coating at the same application rate as the first coat, making sure the fabric is fully embedded.
5. Repeat this procedure for each adhesion test.
Precautions
1. The substrate must be clean and dry. Do not perform adhesion tests when ambient or substrate temperatures are below freezing.
2. Allow each test sample to cure for at least 4–5 days before testing. Lower temperatures will slow the cure time of the adhesive, requiring additional cure time. Do not allow the test area to freeze.
Performing the Test
1. Test the adhesion with a fish scale. Tie a knot in the fabric that was left out of the coating. Hook the fish sale into the knot.
2. Using the fish scale, pull the fabric strip straight up.
3. A minimum of 2 pounds of “pull strength” must be observed or registered on the fish scale for the coating adhesion to be considered acceptable. (The minimum is 2 pounds per 1 inch of fabric. The ideal pull is at least 4 pounds per 1 inch of fabric.)

Determining Results
1. Conditions Indicating Test Failure:
• If the coating separates completely from the roof surface, the test is a “fail.”
• If any tests fail, repeat the adhesion test using the appropriate primer.
2. Conditions Indicating Test Passing:
• If the fabric separates from the coating, leaving the coating still adhered to the roof membrane, the test is a “pass.”
Documentation of Tests Performed on a Roof
1. All adhesion tests should be documented with photos of the cleaned substrate, the wet coating and fabric embedded, and the face or display of the fish scale showing the resistance observed in the test.
2. Forward results and photographs of all test areas to the coating system manufacturer for review.
3. Follow any additional requirements from the coating system manufacturer to achieve the desired warranty.

Be the first to comment on "Prep Work Is Key to Successful Roof Restorations"