
We have been fortunate enough to work on several important buildings in Chicago — Navy Pier, Civic Opera House, McCormick Convention Center, the Chicago Water Cribs miles offshore and the Chicago Club. So, when Matt Zolecki and Jim Smiley from Wight & Company called and asked if I would like to be involved with designing a new copper dome for the Adler Planetarium, I said, “Let me think about it — duh, yes absolutely!”
Like cathedral domes, opportunities like this come only once a century.
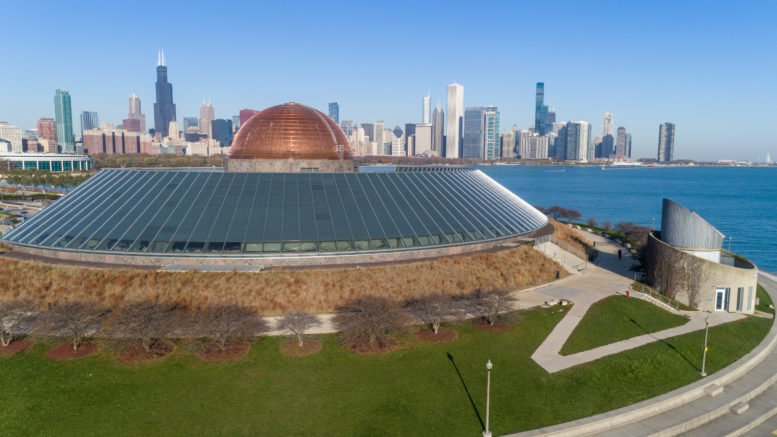
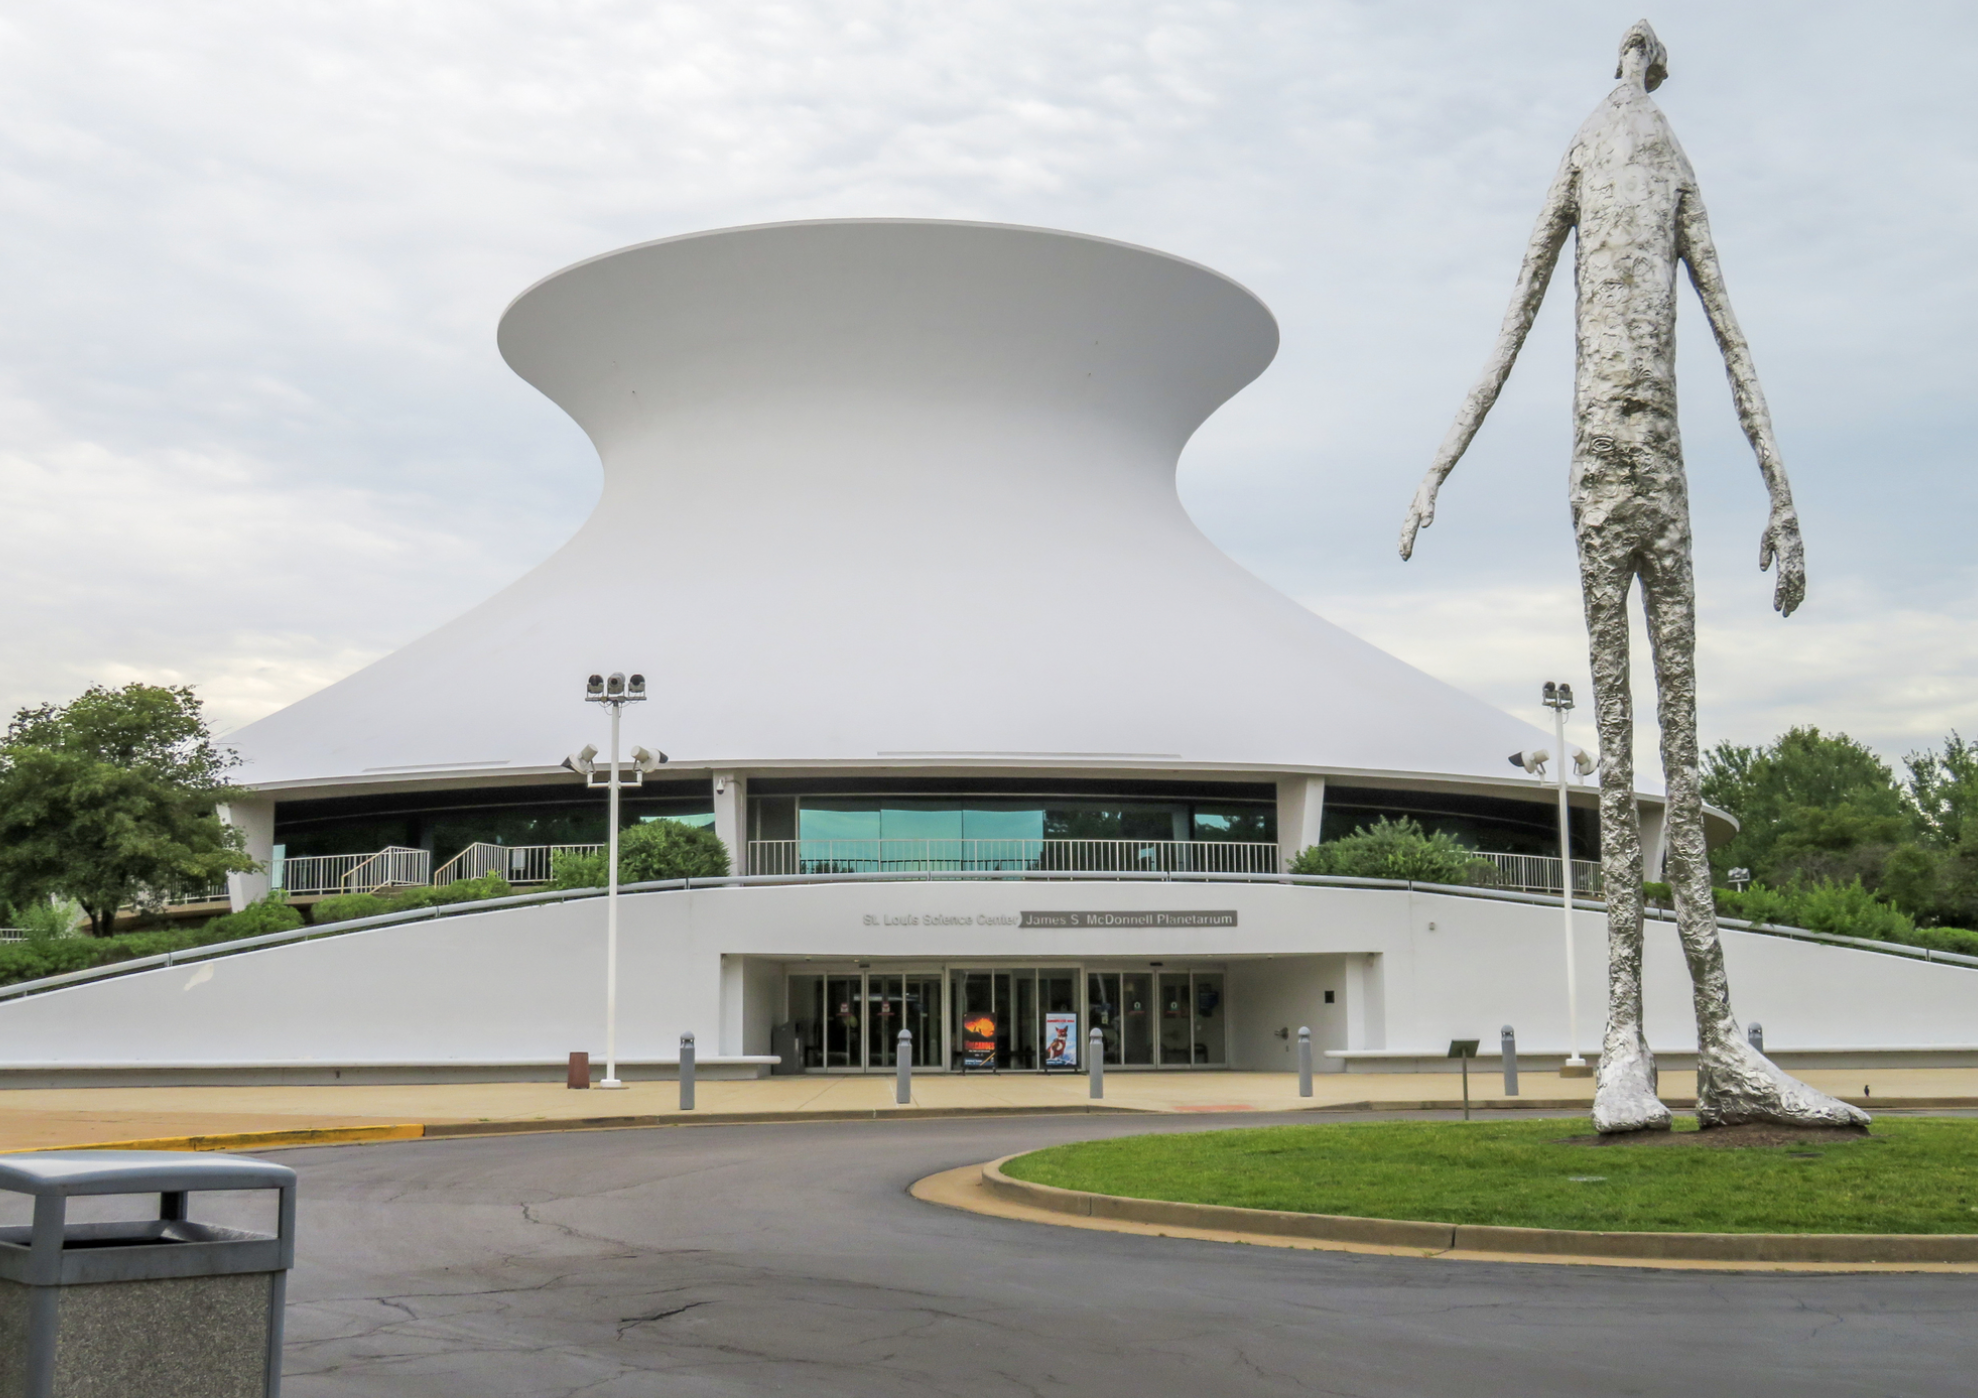
The Adler Planetarium was the first planetarium in the Western Hemisphere. It’s located on Northerly Island on Lake Michigan in Chicago. The Adler is a National Historic Landmark and is located in the Chicago Museum District that includes the Shedd Aquarium and the Field Museum of Natural History.
The Adler is named after its founder and benefactor, Max Adler, who was a senior officer with Sears, Roebuck and Company. He wanted to fund a public facility that would benefit Chicagoans and visitors for generations to come. In 1923, a device had been developed in Germany that could closely replicate the features of the night sky. Max Adler went to Germany to see a demonstration and was so impressed that he decided to donate funds to construct the first modern planetarium in the Western Hemisphere. The Adler Planetarium was opened to the public on May 12, 1930.
Roof Issues
I know you’re expecting me to say that after almost 90 years the dome roof finally wore out; sorry to disappoint. By 1938, something was terribly wrong with the original roof and in 1939 it had to be replaced. Sounds like many of the roofs today — eight or nine years and they are ready to go. It is unknown what the original roofing materials were and what problems developed. The metal roof installed in 1939 featured lead-coated copper.
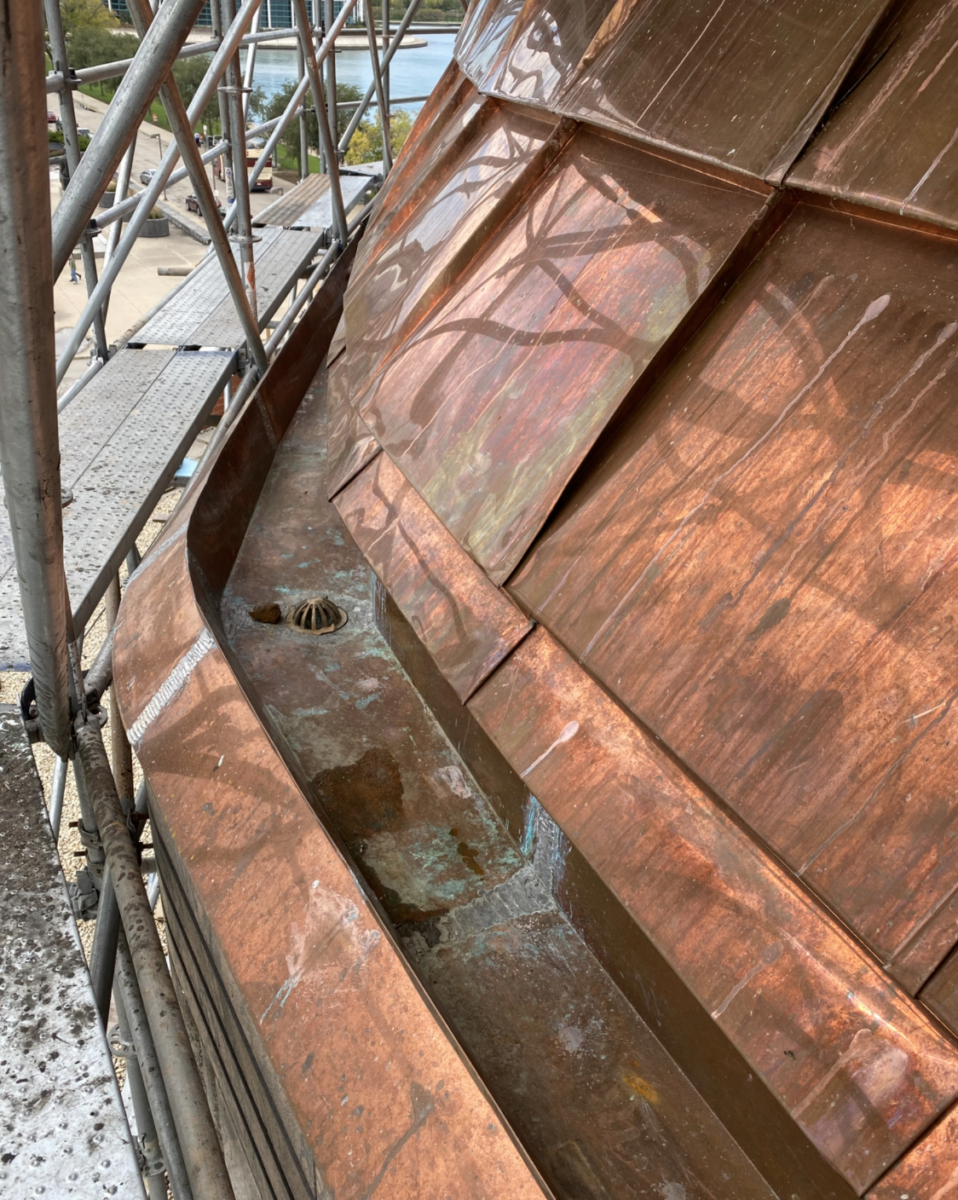
Now, as to what you had hoped to read earlier, after 70 years of service, weak points in the roof started to manifest into roof leaks. With the severe slope of the dome, the concerns with moisture intrusion were at the base of the dome, at the internal gutters and the drains. The lead coating had also eroded over time, so that the dome one saw in 2019 had a greenish patina (see Photo 1), while the dome observed in 1950 had a muted grey appearance.
The Dome
Our company had worked successfully with Wight in the past, so Matt and Jim entrusted us to do the Adler right. While we handled the design and construction documents, Wight worked with the client, who wanted to remain open during the re-roofing process, avoid any noise, and asked if the work could stop when seminars were going on in the space below the dome. (Yes, they were like any client.)
The 1939 roof repair drawings were found and provided a wealth of information. Field investigation was fun in the winds. Climbing a ladder made of brass bars embedded in the roof deck, I vowed to change that access. The existing roof was opened up to understand the construction, and was found to consist of copper panels, bituminous underlayment, and cork insulation installed over a concrete dome deck with embedded nailers.
The dome is composed of an internal gutter and base copper, 16 rows of copper panels, and then the dome cap. The base of the dome, which is composed of granite panels, is 12 sided — a dodecagon. At each of the corners of the dodecagon, an expansion joint runs from the gutter to the dome cap. Each row of panels locks into the panel below. An aesthetic feature is that each of the lower panel locks are covered with a horizontal rib that give the dome a certain lightness of being.
Design Considerations
After field documenting of the existing dome, several design items came to light, some requiring decisions by the owner.
• How would work forces safely access the dome?
• The roof removal and new copper would not be completed in a day, so following the removal of the copper, the substrate had to be made watertight for an extended time.
• We had to determine what type and weight of copper was going to be used. After discussion, it was decided that 20-ounce red copper would be used over the newer zinc-coated copper material, in part to alleviate visual concerns that would lead to inquiries about the environment.
• The cork offered little thermal value. Would the Adler desire additional thermal value? The code requirement of R-30 would almost extend the roof surface out beyond the gutter below. An exception to the R-30 requirement was made due to the historic significance of the building and extenuating circumstances that would require excessive cost to comply. Thus, an alternate for a slight layer of 1.5-inch thermal insulation was included.
• Another key consideration was how the copper panels would be secured to the dome. It was determined that with the application of the underlayment over the existing substrate, trying to locate and nail into existing battens was just too difficult. Thus, two layers of 3/8-inch marine-grade plywood were designed.
Here is a quiz for you: Take a grapefruit, cut it in half, and then try and cover it with small little rectangles. What happens? Due to the curvature of the dome, the plywood required radial cuts at the top and bottom to lay flat and abut the adjacent piece. And the radius changes at each row of plywood. I am sure there are still carpenters out there cursing me — especially the ones who had to remove and replace errant pieces.
Mr. Rich Zizek, The Adler Director of Facilities & Public Safety, was instrumental in getting answers to questions that could delay design, and he helped marshal the project along with the Adler Board.
If one looks at the dome in sections, it becomes apparent that there are three main conditions:
1. Base and internal gutter
2. Panels on the dome
3. Dome cap
So, a plan and details of the base and dome cap were drawn and elevation of the panel and detailing commenced. So that our detailing was correct and feasible, we asked James Wales, Manager, Architectural Services for Revere Copper Products, Inc., to review the details and offer comments. I also talked with several contractors with experience on domes and steeples.
Then, true to my word, I contacted John Rickhoff of John J. Rickhoff Sheet Metal Co. Inc., a craftsman in aluminum and steel, to review how a radial ladder might be constructed from the dome eave to the dome cap for access to the camera on top of the roof. The solution was to bend aluminum angles to the radius and bolt them to the existing brass bar rungs. To be safe, I added handrails to each side that also served as a cable guide so that a harness could be utilized.
COVID-19 Complications
The project, along with the adjacent low slope roofs, were bid. Progressive Dynamics was awarded the job for the copper work and A-1 Roofing was chosen for the low-slope roofing work.
The schedule was set so that the copper work on the dome could be completed in time for the Adler Planetarium’s 90-year celebration. Then, suddenly, it was “STOP! Do Not Pass Go!” Adler closed for all of 2020 due to the COVID-19 pandemic and the project was in peril. I thought with the interior not being occupied it was a perfect time to move forward with the construction, but those above my grade halted the project.
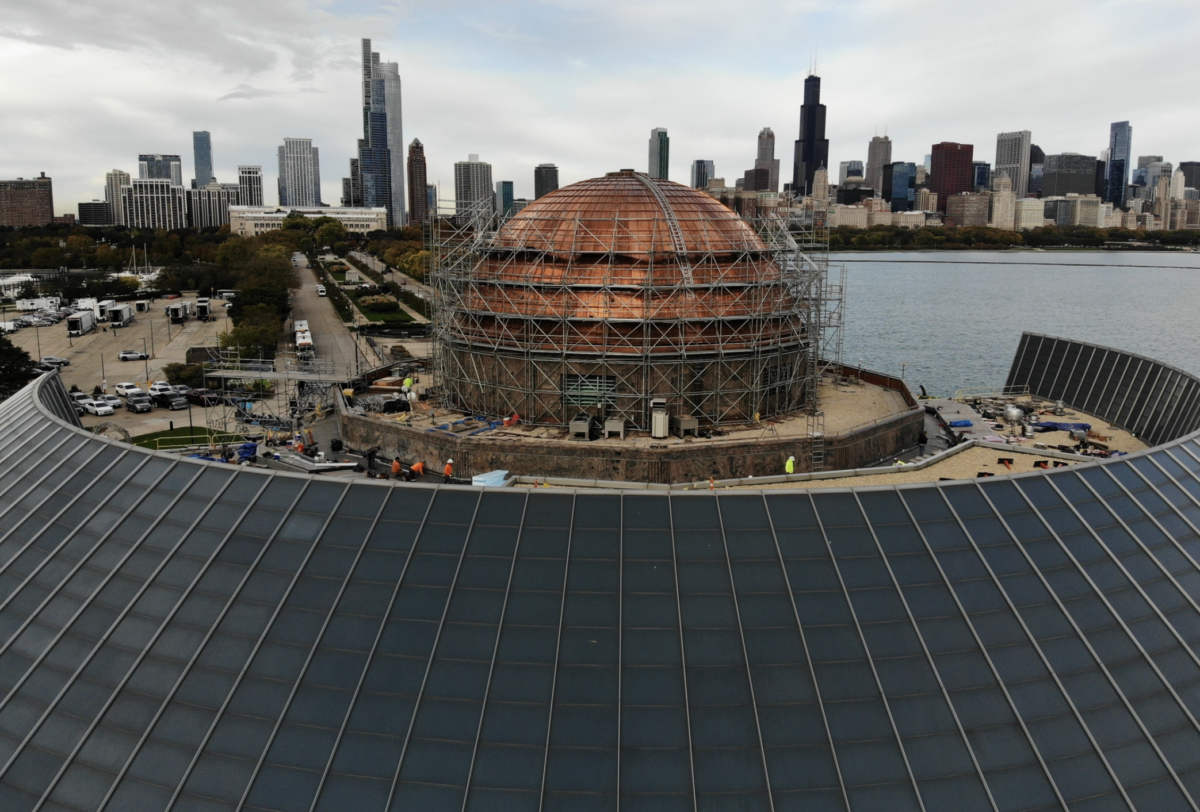
In February of 2021, we received word that the project would go forward. The first order of business was to scaffold the dome, which was a project in itself. (See Photo 2.) After the 42-foot scaffolding was erected, I thought, “Wouldn’t it be great to cover the scaffolding in fabric like it was a Christo piece of art?” When I was told, “Sure, go ahead at your cost,” I decided it wasn’t such a great idea.
The Fun Part — Construction
As an architect, I enjoy working with contractors who value craftsmanship, excellence and seeing the project come to fruition. The first step in the project was the installation of the scaffolding. Full enclosure of the dome was needed, and this required that the scaffolding had to corbel in as it rose in height. Bracing into the dome wall complicated the carpentry work and the installation of the new copper panels.
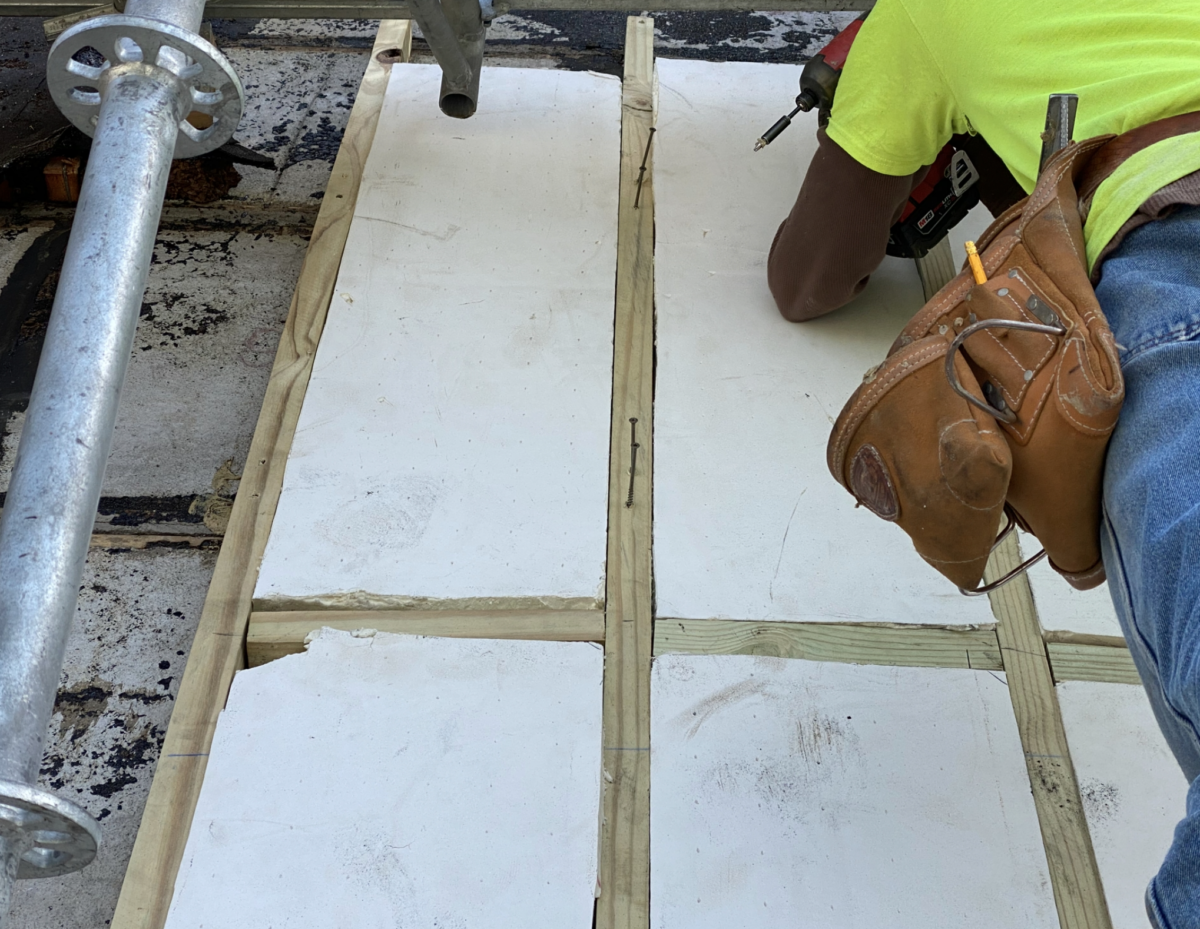
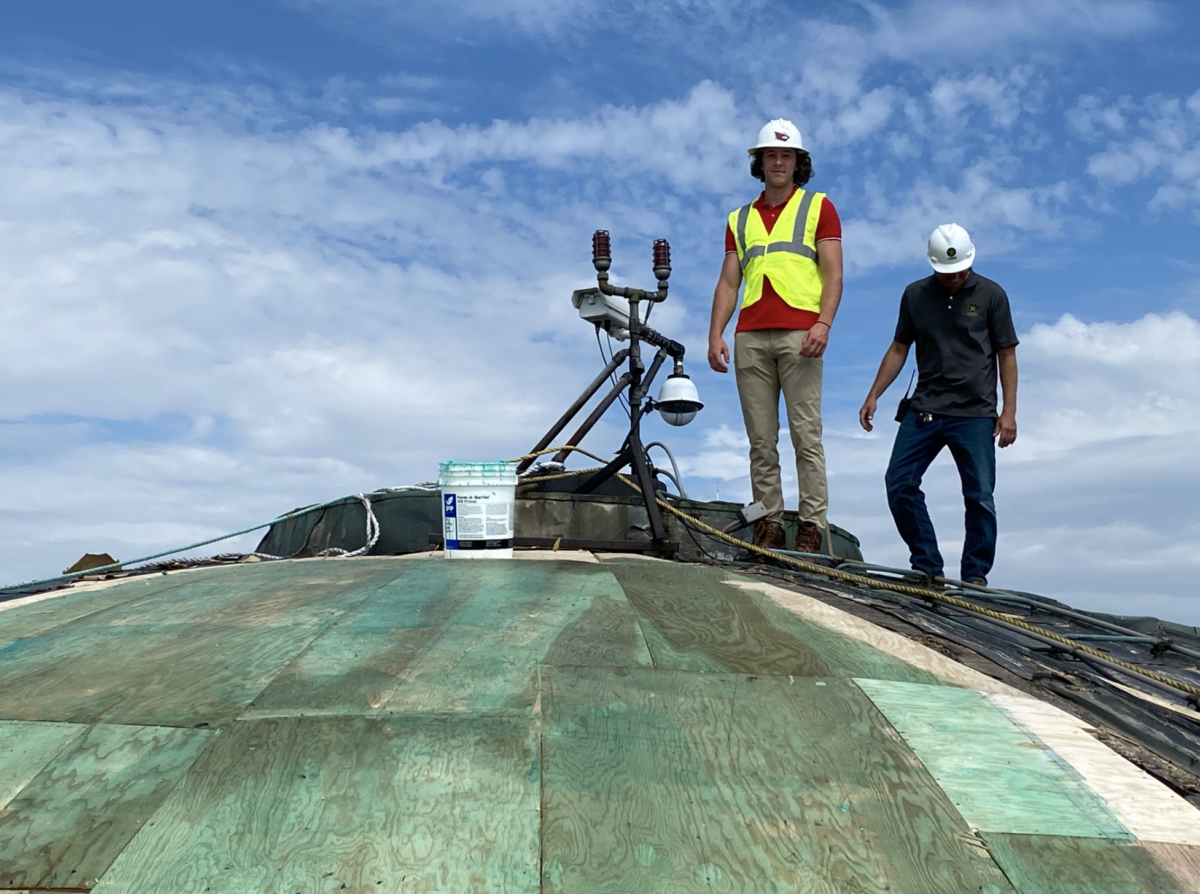
The 14,000 pounds of existing copper was removed (and salvaged for beer money). As the underlayment and cork insulation was removed, vertical two-by battens were installed with their spacing tapering toward the dome. The alternate for new insulation was taken, and thus the carpenters took months installing the new vertical tow-by battens, placing coated fiberglass insulation cut to fit between the tapering nailers. (See Photo 3.) Two layers of 3/8-inch marine-grade plywood were screwed down with stainless steel screws and then primed before applying a self-adhering bituminous underlayment. (See Photo 4.) Wrinkles in the self-adhering membrane, which sometimes presented themselves due to the curvature of the dome, were not acceptable, and some sections had to be removed and new membrane installed. By this time, the carpentry firm hated me, but the crews loved the additional time.
I also reviewed the plywood installation along with Rodger Leonard, the hands-on president of Progressive Roofing with more than 40 years of experience with copper, and the sheet metal foreman. Some sections of plywood required re-working, especially at elevation offsets where the carpentry work would affect the appearance of the copper work.
The most important factor in approaching the project from Progressive Roofing’s viewpoint was to assemble a team of expert craftsmen, and each member was handpicked.
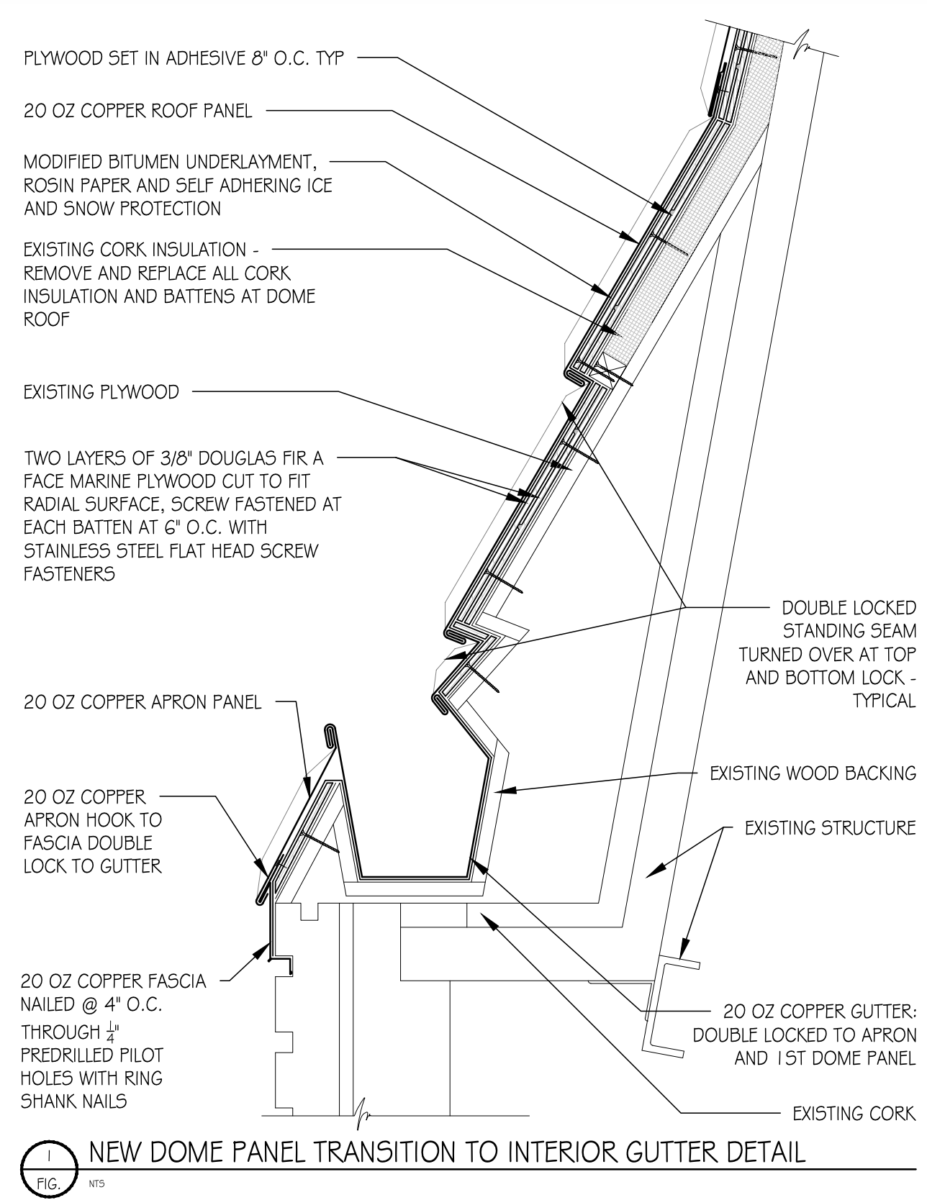
When the new decking reached approximately halfway up the dome, the replacement of roof drains and the installation of the inlaid copper gutter commenced. The existing construction at the dome to the gutter was a complete set of angles, corners and elevation changes. (See Figure 1.) These conditions required a tremendous amount of handwork, numerous lock seams, and soldering of the copper. (See Photo 5.) The first two panel rows up from the gutter are much shorter than the dome panels and are at a 20/12 slope. At the top of these two panels, there is a break in the slope, which changes to 42/12.
Prior to the installation of the copper panels, a substantial amount of layout work was required. The 16 rows of panels had to be set and marked. (Quiz question 2: How do you mark 16 horizontal lines on a dome?) The layout of the 12 expansion joints, one at each corner of the dodecagon, was also required.
The panels were shop fabricated. Each row of panels was a different size, and the sides of each panel had to taper, then be folded up and across so that it could be hand locked in the field to the adjacent panel. The locations where soldering was to take place were all pre-tinned.
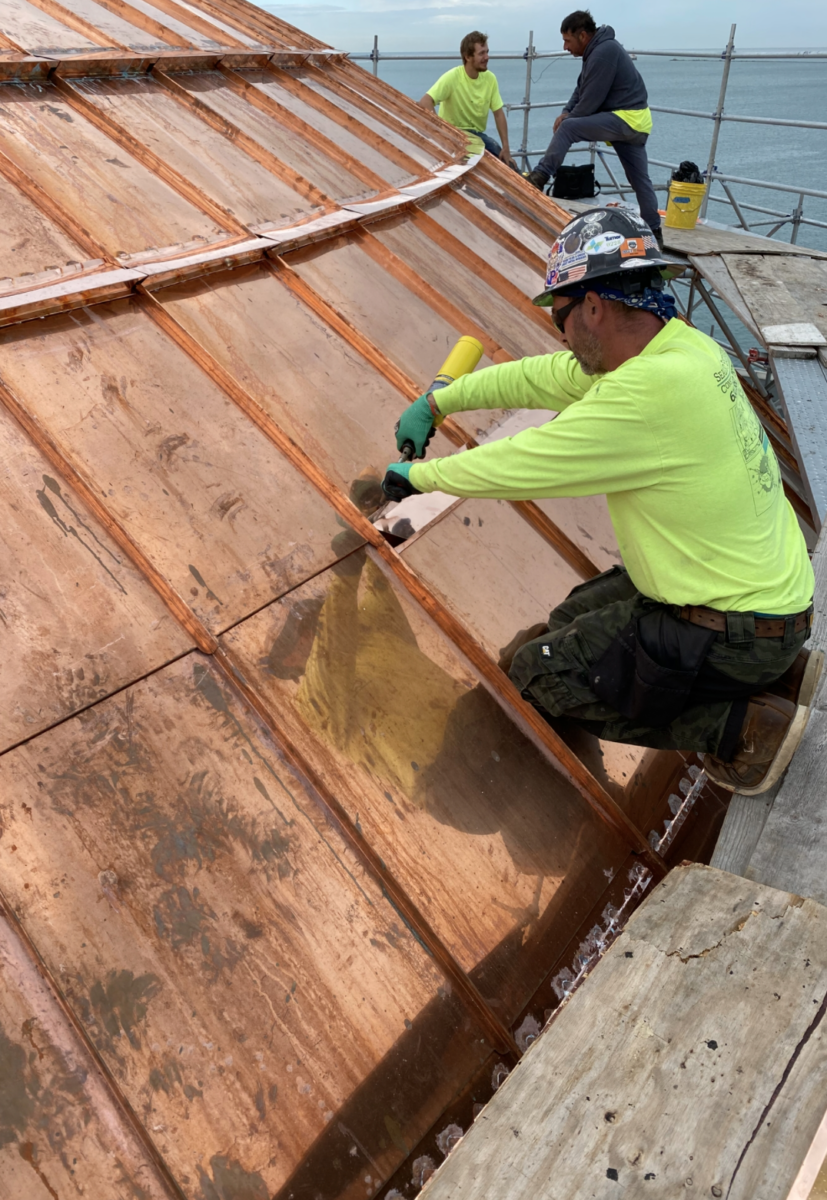
Day after day, week after week, the panels were installed, moving closer to the top of the dome cap with each completed row. After the panels were locked with the panel below and the seams turned over, the lower lock was hammered down tight. The horizontal panel seams were covered with a decorative copper band, each row fabricated so that the top of the band was horizontal. (See Photo 6.)
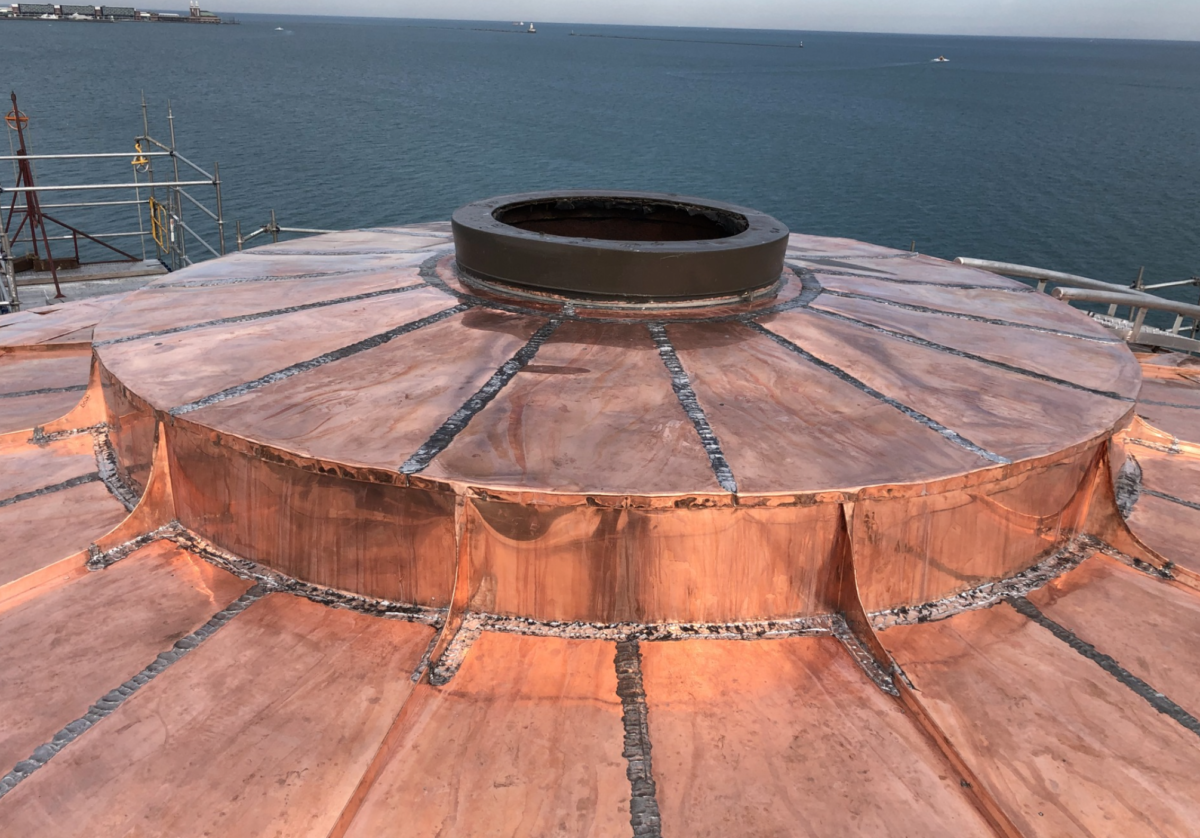
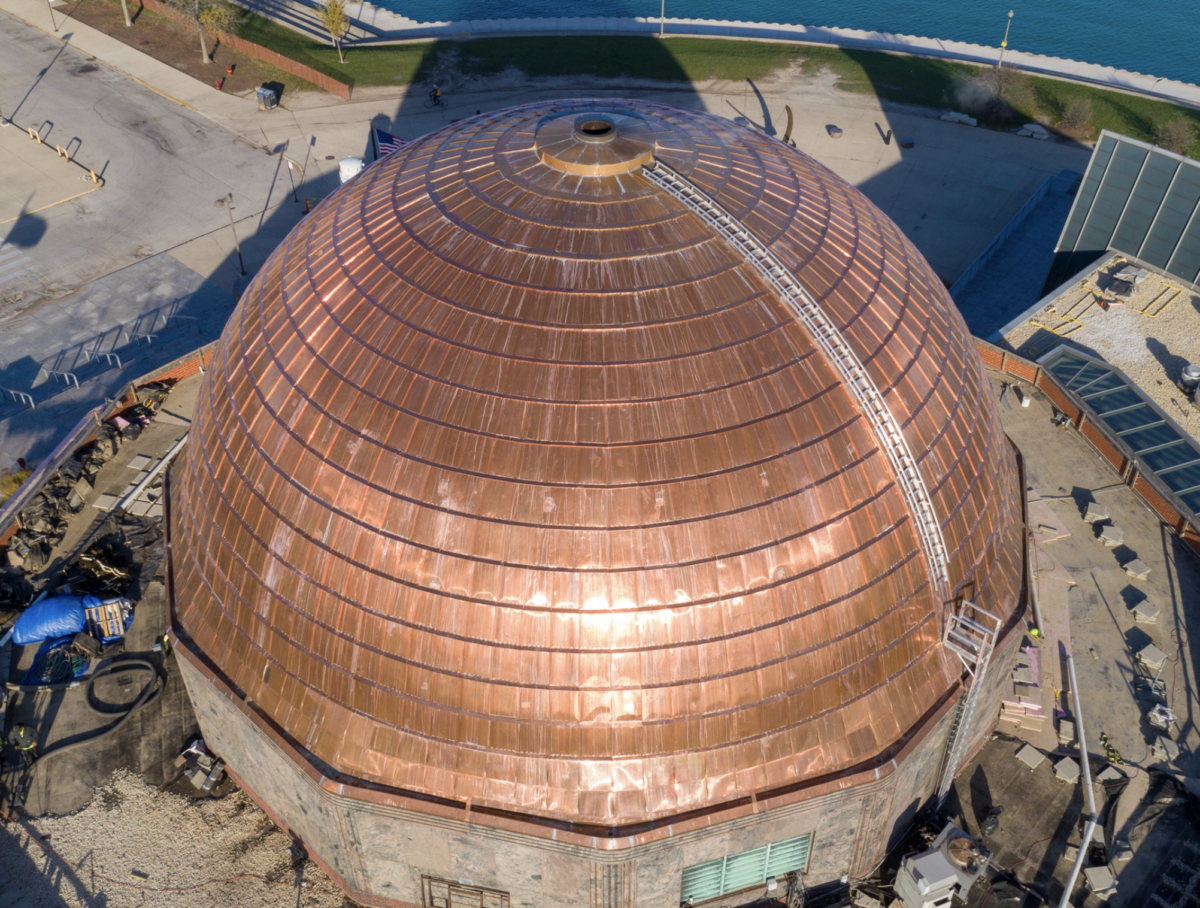
The dome cap was another challenge. As the expansion joints terminated at the raised portion of the dome cap, a flared transition was detailed. (See Photo 7.) The copper panel atop of the cap changed from a standing seam to a flat lock fully soldered seam. The center of the dome cap is a cast iron flue from the boiler room with a cast iron cap that allowed only inches for the copper to terminate. The copper panels where fabricated to turn up at the flue, and a stainless-steel draw band was installed, and the copper turned over the draw band. The copper installation took more than four months. At completion, the new access ladder and radial ladder were installed. (See Photo 8.)
The weather challenged the work. In addition to inclement weather, the winds off Lake Michigan not only resulted in huge waves crashing into the stone seawall, but also made it difficult to hold on to the copper panels. Lasers didn’t work on the dome, and some of the young talent were at a bit of a loss as to how to ensure the panel locks were level. Rodger reverted to using a water level, something he had used some 40 years ago, thus passing on some tried and true older techniques.
On the final inspection, I noticed that the crews had placed the year in solder on a panel just below the cap, forever memorializing the date of installation for the next architect and contractor to see in 2120.
Final Thoughts
I prepared for this project with empirical experience over the past 35 years, but it was the craftsmen who brought it to realization. On a Thanksgiving Day as I complete this article, I am thankful for being part of a great team of owners, architects, construction managers, carpenters, roofers, plumbers and sheet metal crew members who created a new Chicago Icon on Lake Michigan’s seashore.
About the author: Thomas W. Hutchinson, AIA, CSI, Fellow-IIBEC, RRC, is a principal of Hutchinson Design Group Ltd. in Barrington, Illinois. For more information about the company, visit hutchinsondesigngroup.com.
TEAM
Adler Planetarium: Rich Zizek, Director of Facilities
Hutchinson Design Group: Thomas W. Hutchinson, Principal; Travis Ohland, Lead Draftsman
Wight & Company: Matthew Zolecki, LEED AP BD+C, Project Executive; Jim Smiley, LEED AP, Project Manager
Troop Contracting: Brian Hatlen, Project Manager; Eric Conboy, Site Superintendent
A-1 Roofing Company: Jim Gara, Project Manager; Jeremy Schnizlein, Assistant Project Manager; Tim Stratton, Superintendent
DeFranco Plumbing: John Ryan, Project Manager; Roy Andersen, Foreman
Gilco Scaffold: Marek Chimiel, Project Manager
M & E Construction: Scott Wooley, Project Manager, Paul Z., Foreman
Progressive Dynamics Inc.: Rodger Leonard, Project Manager
Be the first to comment on "Iconic Adler Planetarium Shines Once Again"